 |
| [Our new raised bed, nearly present day] The first veggies of the season are in! (I've added a few more things since this photo!) |
 |
| Alex watering our (huge!) tomato plants at the apartment community garden, circa 2012(?) |


LEFT: One of our harvests from our apartment garden. RIGHT: Sunflowers that Alex grew for me at the apartment as a surprise when I first moved to Maryland in 2011. They're my favorite. :)
Through this experience, we made some great friends and learned a lot while growing tomatoes, romaine lettuce, onions, and bok choy, among other things. We had so much fun working together in the garden that we knew it was something we would continue to do together for years to come, and we dreamed of having a garden of our very own. I'd like to tell you all about how we arrived here, but first, you might be asking:
"Why a raised vegetable bed? Why not stick to container gardening, or planting directly in the soil?"
It's true; you can grow a lot of vegetables with great success in pots for less money and less legwork. I've done this before and while it is possible to get some decent yields, a raised bed has always been my dream. Not only will it be a permanent feature in our yard, raised beds provide better drainage than in-ground gardens, and allow for the soil temperature to warm up more quickly in the spring. I still love container gardening, especially for herbs and compact vegetables. I'm sure I will eventually blog about container gardening specifically, as it is a great option for a gardener just starting out.
Back to our gardening journey-- let me set the scene for you... ;)
Back to our gardening journey-- let me set the scene for you... ;)
The Site
As soon as we moved into our house in 2013, we started making improvements to our yard, which was largely overgrown, to say the least. On a side note, please enjoy these before-and-after photos... Still a work in progress, but my, look at how far we've come! (NOTE: These photos are of the back yard only... the photos of the front and side will have to wait for another time! ;) )"Before and After"
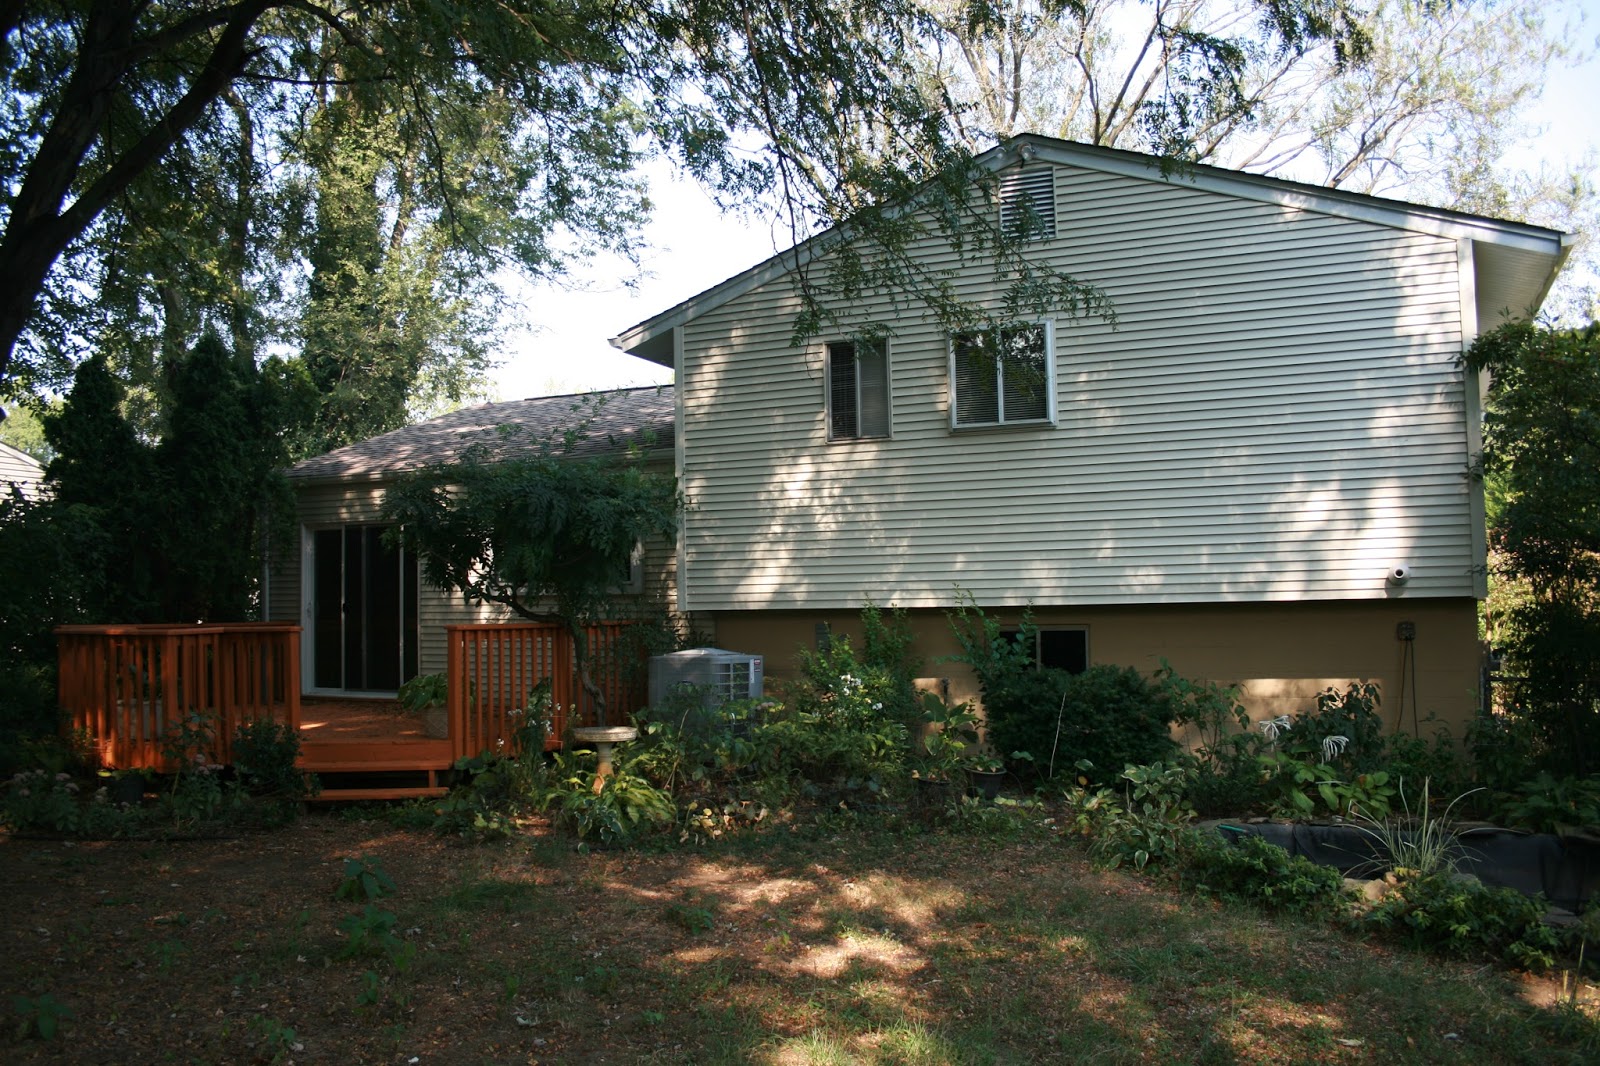 |
| BEFORE: Overgrown limbs hang down, pointing at the ground and blocking out most sunlight. Grass is nowhere to be found... it's mostly mud with some weeds. The yard is really dark. A murky koi pond at the far right of the picture is in disrepair, a breeding ground for mosquitoes. Photo taken from present-day vegetable garden location. |
 |
BEFORE: A large cedar tree planted Very close to the deck is in the way of the door when walking onto the deck from inside. A huge wisteria tree has been trained to grow in front of the window, taking up a lot of room on the deck and blocking light from entering the house.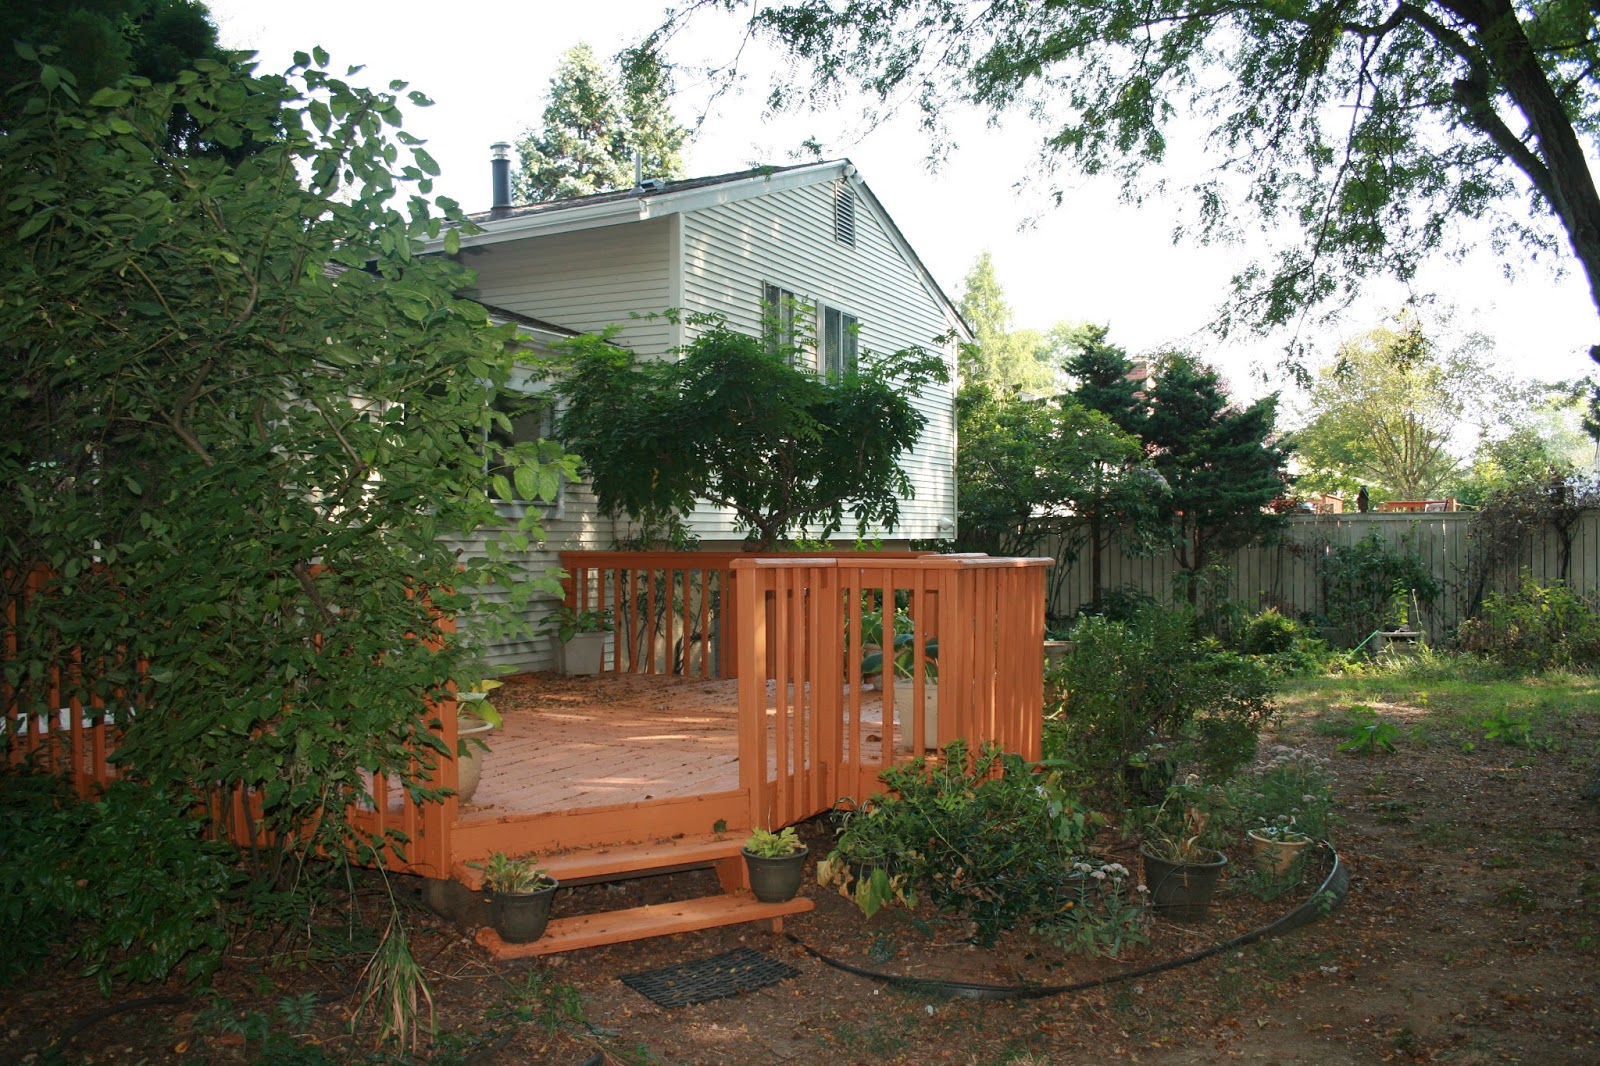
BEFORE: Old rubber edging is popping out of the ground everywhere. Over 200 rusted and broken tomato cages are scattered around the yard. Also present are around 20 or 30 foam planter pots, some of which contain hostas [which we replanted into the ground] and all of which house large ant colonies. (Yikes.) In the foreground, a badly-pruned dogwood tree reaches for the light. It isn't doing that well and barely blooms due to the lack of sunlight.
|
And now for the after photos! |
| AFTER: The obtrusive cedar, poorly-pruned dogwood and overgrown wisteria have been removed, which cleans up things significantly and allows for more sunlight to reach the house and side yard. |
 |
| AFTER: The tree in the foreground has been pruned to allow for more sunlight and all the trash, foam pots, broken tomato cages and rubber edging has been removed. We also cut in an extension of the flower bed to go around the tree, where we intend to fill in with lariope grass and perhaps some bulbs. We haven't cut in the edges yet this year and we still have some weeds, but overall, an improvement! (We also relocated existing hellebores from around the yard to be in front of the deck where it's nice and shady, and we relocated the sedums that were there to be in the front where it's sunny.) |
 |
| AFTER: After the tree was trimmed, the entire yard received more sunlight. We have slowly been getting more and more grass in the backyard, though there are still some bare patches, weeds, and invasive grasses. But look, it's GREEN! The removal of the koi pond (right corner of the house) makes for a nice sunny open garden patch, perfect for some beautiful flowering perennials. I have plans to include: black-eyed susan, coneflower, salvia, phlox, daylilies, asters and more! |
There's still plenty to do. I will keep you updated on our progress! :) Later in the season, I will have to share some photos of our sideyard, which underwent a dramatic transformation. For now, back to the vegetable bed!
Choosing the Right Location
Our back yard, while it has plenty of space to fit our needs, is mostly shaded by mature trees. The sunniest area was originally occupied by a large patch of overgrown brambles (old blackberry and raspberry bushes that no longer produced fruit) and a small, murky koi pond that was in disrepair.
Over time, and with some assistance from our neighbor's landscape company, we were able to clear out all the overgrown brambles and remove the koi pond*, which opened up a nice sunny patch, big enough for our raised bed to get at least 6 hours of direct sunlight per day, which is what most vegetables require.
(*I can hear you now: "NO! Not the koi pond!" Sadly, yes, it had to go. I love growing things, but not particularly algae and mosquitoes, of which there were plenty. The fish had long since disappeared, thanks to the local heron population, and even the frogs had lost interest because the water got too murky. The new pump and filters we needed were so expensive and the maintenance so extensive that having it professionally removed was actually a cost savings. And now that it's not occupying a large portion of the one place in the yard that gets full sun, our options are practically unlimited!)
In order to receive 6 hours of direct sun, the bed had to be far enough away from our fence to not be shaded during the day. We also wanted to take into consideration any potential future landscape improvements (new shed, possible patio, possibly other raised beds) so that everything fit appropriately into the future plan. With these ideas in mind, we started to draw.
Overall Design
Being the planner-types that we are, and architects as well, we immediately went to the drawing board and came up with the drawings below. (You do Not need to do drawings like these to build your own raised beds.)
 |
| Our schematic drawing showing the existing fence, future shed, and potential future hand-painted design on the fence. (I've since changed my mind about the painted design.) South is UP in this drawing. |
Size Considerations
We decided an oblong rectangle would fit best into our overall landscape vision. When sizing raised beds, it is typical that beds are no wider than 4', so that you can easily reach to the middle when tending or harvesting. In regards to length, there's no standard, but in general you want to choose a length that's not long enough to be inconvenient when walking around to access the other side. For us, in order to keep costs down, we decided to stick to sizes that would minimize the number of cuts that had to be made to the lumber, thereby reducing labor costs. (More on the lumber in a moment.)
We decided to make our bed taller than the typical raised bed, so that the top edge would be level for the entire length (our yard slopes), and high enough to keep out local varmints, namely rabbits and groundhogs. The depth of our bed extends the full height to the ground below without any barriers, which means that there is plenty of room for roots. Most vegetables require a 6-to-12 inch rooting zone, with 12" being the ideal.
Most importantly, it's critical that you don't bite off more than you can chew. A big garden can be tempting but also may require more time than you have available to give it. Starting small is always a good idea in gardening. You can always expand later.
Materials
Most raised beds are constructed of wood, though concrete blocks or bricks can also be used. Some sources will advise against using pressure-treated wood because prior to 2004, arsenic was used in the chemical pressure-treating process and would leech into the soil. Arsenic is no longer used in this process, and today pressure-treated wood is certified as safe for edible gardening. (Most pressure-treated lumber, including the specific brand we used, is treated with micronized copper azole (MCA). Also commonly used is Alkaline Copper Quaternary (ACQ). Both have been tested and certified as safe for agricultural use.(For more information on MCA, click here. To read more about the safety of pressure-treated lumber in gardens, click here for a brief article by Fine Gardening Magazine or here if you want to read the findings of a more in-depth study regarding the use of ACQ.)
However, if your aim is to avoid pressure-treated lumbers altogether, there are several other woods that are naturally resistant to rot. Red cedar and red wood, in particular, are often used in outdoor projects due to the presence of natural oils. However, both of these options tend to be pricey. More information on red cedar and other woods here.
Construction
While a simple raised bed is an easy DIY if you have the right tools and a weekend, we preferred to call in a professional to avoid the hassle of hauling lumber and renting power tools, especially for our particular design. This was a good decision and worth every penny to us for the sake of our sanity. (Neither of us are particularly skilled in carpentry, despite our architecture school training.)We chose to use stacked 6x6" square pressure-treated posts (similar to these) and based the length and width of our bed on the standard lumber sizes in order to minimize the number of cuts that would have to be made by the installer. The 6x6 lumber made sense to us, as we would like this to be a permanent feature in our backyard. Thicker lumber has a slightly higher resistance to rot, and the fact that our bed is deeper than most made us concerned that thinner lumber would not hold up as well over time. The posts were stacked and then held in place by steel rebar that fits inside holes drilled through the wood.
 |
| Photo taken the same day it was installed: March 2, 2016. |
For a great simple raised bed DIY tutorial, check out this one by the Pioneer Woman or this awesome Youtube tutorial.
DIY not your thing but you also don't want to hire a professional? Maybe one of these pre-made kits is for you!
CedarCraft Raised Garden Bed 49" X 49" X 12"
Greenes 4 Ft. X 4 Ft. X 21 In. Tiered Cedar Raised Garden Bed
Greenes 4 Ft. X 8 Ft. X 10.5 In. Cedar Raised Garden Bed
Greenland Gardener 42 in. x 42 in. Raised Garden Bed Kit
Finishing
Through the pressure-treating process, our lumber already had some protection against the elements. In fact, most sources seem to indicate that finishing your wooden raised bed is completely optional.
However, we thought it wise to add another layer of protection if possible, and decided to stain it with an all-natural stain called Penofin, made with Brazilian Rosewood oil. This product is earth-friendly and environmentally safe; it's the only stain that has been approved for organic gardening. If you decide to use this product for pressure-treated wood, make you sure buy the right kind. It will specifically say "For Pressure-Treated Wood" right on the can.
 |
| See? Right on the can! |
 |
| Don't forget to stir! |
According to our research, this product claims to help prevent leeching of any kind from pressure-treated lumber, but its main selling point for us is the UV protection which will help our raised bed to last a long time.
There was only one place locally that sold this product, and it wasn't cheap. A gallon of the stuff costs $45-$50 and it doesn't appear to come in half gallon. Though our project only used a portion of the can, I intend to reserve the leftover stain for re-applying as needed and other future projects.
 |
| Before stain. (Plastic protection to cover the surrounding area is a good idea.) |
 |
| The first brush strokes. (More orange than I expected... but it fades some when dry and more over time.) |
 |
| Tolerant husband who puts up with my photo-taking, pictured here with a volunteer rose bush. |
 |
| Nearly done. (I did my fair share, but there's no photos to prove it!) |

 |
| Final touch-ups. |
The application was pretty simple, and the dry time relatively short. According to the directions, only one coat is needed. I had planned on doing two coats, but the March weather here in Maryland was being uncooperative. I'd like to put on another coat this fall.
 |
| All done! (For now) |
Here's a couple helpful tips if you've never stained anything (especially outdoors) before:
- Let your wood dry out. It's important to take time and let new pressure-treated wood dry out prior to staining. This can take anywhere from two weeks to two months, depending on your climate and weather conditions. However, you can do a quick test to see if the wood is ready by splashing some water on the lumber. If the water beads up, the wood is still too moist to properly accept stain. If the water soaks in, you're ready to go.
- Proper prep is key. If you've ever painted a room before, you probably know by now that the better job you do at prepping the walls (light sanding, wiping off dust and debris, taping off the trim, etc), the better your end result will look. It's the same with stain. Remember, you're staining something that is outdoors, meaning that your raised vegetable bed probably already has all kinds of dirt, debris, and pollen clinging to the surface. While I felt that sanding would be overkill, I did go around the entire surface with a sturdy [dry] scrub bush and followed up with a wipedown from a dry shop towel.
- Don't "glob" it on. This should be obvious, but in the heat of the moment one can get carried away. Thinner coats are going to soak in better, therefore being more effective and looking better in the long run. Thick coats of unabsorbed stain will chip off later if left to dry. If you end up with any thick patches of unabsorbed stain, make sure to wipe it off in the direction of the wood with a lint-free cloth. An old cut-up t-shirt is the BEST for this.
We had a lot of fun with this project! At last, it was time to sit back and enjoy our work. I took the liberty of making us some celebratory mimosas that we enjoyed from the deck.
 |
| Celebratory mimosas! (with bonus compostable garnish! ;) ) |
The next step would be filling our raised bed with soil! Whew, were we in for some hard work...
I'll tell you all about it, next time! Until then...
Ciao!
--Sarah


